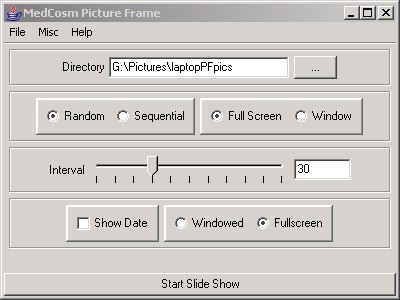
This program performs a few tasks:
- Electronic pictureframe - a slideshow (sequential or random
order) of pictures. Cycles indefinitely through a selected directory
under a few basic user controlled parameters:
- interval (between pictures)
- directory
- overlayed date stamp
- full-screen vs windowed mode
- stop/pause modes - "esc" terminates slide show,
"space bar" pauses show
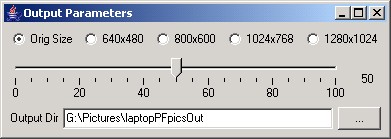
- Batch image processor - performs some basic but useful processing
steps on all images in a directory. Useful for prepping pictures
prior to sending out for digital prints, or for preparing pictures
for use on a digital pictureframe:
- resolution reduction
- image compression (reduction in quality)
- superimposed date stamp
The pictureframe run as a GUI:
Download the Medcosm Pictureframe
program. It can be run as a GUI by double clicking on it or calling
it as:
java -jar pictureframe.jar
or it can be run from the command line using the syntax:
java -Ddir=/pics -Ddelay=30 -jar pictureframe.jar
or
java -Ddir=c:\\pictures -Ddelay=30 -Dborder=true
-jar pictureframe.jar
The "-Dborder=true" will display the usual frame with minimize/maximize/quit
buttons around the picture, otherwise the program displays images
in full-screen mode.
The source code is released under the GPL
and can be found here.
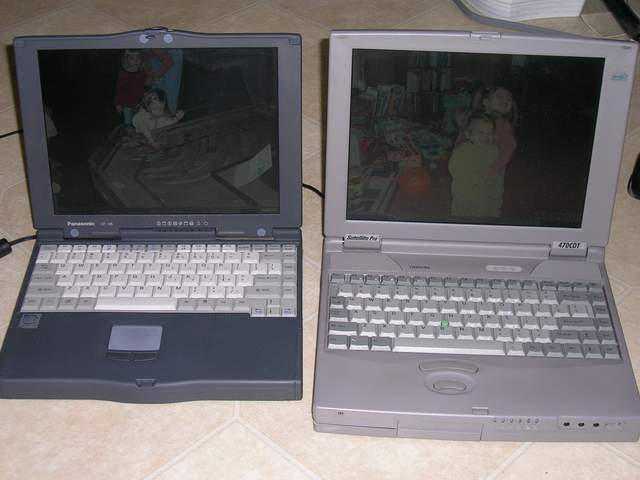
I whipped this up because I was building an electronic picture frame
and couldn't find a simple program to just display full screen images
after a pause. Yes, 'zgv' does a similar feat without the
JVM from a frame-buffer (eg, non-X-window) console, but the video
didn't work on my old laptop even after I spent considerable time
compiling static binaries and 'xzgv' doesn't have a slideshow.
There are plenty of other ways to do the software for an electronic
picture frame (eg, scripting an image load into the background,
lots of image viewer utilities that also have a slideshow mode,
etc.), but I like the write-once-run-anywhere nature of Java, it
works fine on my 10 year old laptop with pretty modest resources,
and it didn't take very long to create.
By the way, if you find the process of examining thousands of photographs
so that you can extract some good ones for display in your electronic
picture frame tedious, then look at the sparse
file copier.
Cookbook
steps for creating an electronic picture frame
DSL (DamnSmallLinux)
is a natural for the pictureframe since it works well on pretty
old (and inexpensive) equipment. My goal was to build some low-power
low-maintainance, and low-cost systems filled with hundreds (or
thousands!) of digital pictures that I have taken over the years.
These systems are destined to be holiday gifts for those in the
family who might appreciate such things. There are definitely more
efficient ways to do this than the way I chose (using Java), but
it does work well, so I don't feel the need to redo it at present.
Here is a quick overview of the process:
- Obtain an old laptop with adequate specs for DSL, java, and
some pictures. I recommend a pentium laptop with 64MB and a 500MB
or larger HD. Also a network card will make the installation a
bit easier. A system like this is obsolete by almost any standards
so you might be able to get it for free if you poke around. At
worst case, you can probably buy such a system on-line for <$100.
- Get a recent DSL
distribution and create a bootable CD. If you are trying to install
DSL to a laptop which has a network connection but doesn't have
a CD try this.
- Boot DSL from CD on the laptop.
- Do an install of DSL to the laptop harddrive (see the DSL FAQ
if needed), an extravagant install of this OS will take up <
200 MB and leaves plenty of space for pictures on my laptop, even
though the HD is tiny at 810 MB!
- Using the "enhanced desktop", the DSL panel will
give you the option to install other modules... choose and install
Java. It will download it off the net and automatically install
it.
- Download my pictureframe program.
- Place your pictures in a directory on the laptop via FTP, or
copy them from a CD.
- Try running the pictureframe program to see that things work.
It is executed with the command: java -jar pictureframe.jar
- Make sure that screen blanking is off or else
your pictureframe will go black after approximately 20 mintues.
This problem can be infuriating since screen-blanking can arise
from several different places:
- The BIOS - You might need to press ESC, F1, or DEL at boot
time to get into the BIOS. Some systems have power-saving
features including screen-blanking which will interfere with
the performance of your electronic picture frame. Other systems
need to run a special program to get into the BIOS settings.
Didn't you Google for this type of thing before you bought
the laptop?!?
- The linux kernel via APM or ACPI - The good news is that
your blanking is software controlled, the bad-news is that
there's an awful lot of software running in your obsolete-computer-turned-picture-frame.
Here are some possibilities:
- xset s off
- xset s 0 0
- xset s noblank
- xset -dpms
- setterm -blank
0
- setterm -blank
0
- setterm -powersave
off
- setterm -powerdown
0
- Because we want this to be a pictureframe and not a linux-box
which needs a login, the console login must be disabled. This
can be done as follows:
- create the autologinuser program by compiling the following
program. Because DSL doesn't have GCC included, I compiled
this on a different machine and transferred it to the laptop
via a USB flash drive.
int main()
{
execlp( "login", "login", "-f",
"UserNameGoesHere", 0);
}
(replace UserNameGoesHere with whatever user you want the
pictureframe to run under) Compile with the command
$ gcc -o autologinuser
autologinuser.c
if you get errors, then the system you are compiling
on might have different libraries than your electronic picture
frame. Consider doing the compile with the static flag ("-static")
for a larger but more standalone binary.
- place the autologinuser
binary in /usr/local/sbin
on the laptop
- edit /etc/inittab
and replace the line:
1:2345:respawn:/sbin/getty
38400 tty1
with a new line such as:
1:2345:respawn:/sbin/getty
-n -l /usr/local/sbin/autologinuser 38400 tty1
- You can edit the .xinitrc or similar file so that it runs the
pictureframe automatically with the command java
-Ddir=/pics -Ddelay=30 -jar pictureframe.jar or something
similar. Now the box will boot, login, and run the pictureframe
program automatically.
Comments
- My initial goal was to burn DSL with pics to a CD so that the
pictureframe doesn't need a harddrive. It can be done, but I didn't
have the patience in mastering a new DSL disk with the needed
resources. Besides, the CD would spin up and down every 30 seconds.
I eventually bought an 810MB drive for <$20 and it has saved
hours of hacking. But I'd still like to learn how to master a
DSL CD with images, java, and this viewer.
- For a completely silent solution, you can get DSL on a flash-RAM
card and an IDE-Flash drive for <$80 right on the DSL
site. Cool.
- Email me if you find a better (simpler, cheaper, faster, cooler,
warmer, or fuzzier) way to make an electronic pictreframe.
- If you know what you're doing, the whole process can probably
be done in an hour.
Putting DSL on a laptop which has a
network connection, but no CD drive:
The following is from the www.damnsmalllinux.org
forums (search for "tomsrtbt") but is shamelessly reproduced
here to facilitate getting an OS on your pictureframe quickly:
Having read the many posts of how to install DSL with no cdrom using
a hugh stack floppies, I wanted to createa a script using only one
floppy.
I wanted to make a simple way to install DSL on older laptops that
have NO CDROM.
I started by looking for a single floppy Linux distro with good
pcmcia network support.
I have found that TOMSRTBT is very good. It works with several old
pcmcia network cards.
The systems that I have used for testing have:
32MB memory
1.44 floppy drive
128MB HD
800x600 screen
Linksys PCMCIA network card model PCMLM56
Also works with Xircom RealPort2 Model R2E-100
I have written a tiny frugal_lite.sh. It is written in ASH shell.
It provides the traditional "poorman's" install and boot
floppy creation via the net.
First you must download and create
TOMSRTBT disk. (http://www.toms.net/rb/)
With your pcmcia card inserted try booting TOMSRTBT and see if network
card is seen.
After booting up TOMSRTBT be sure to REMOVE the TOMSRTBT disk.
Look at the output of the ifconfig command. If you see your IP
then you are ready to go.
If you see 1.1.1.1 then you must manually input your IP address.
Like the following two lines:
ifconfig eth0 192.168.0.14 netmask 255.255.255.0
route add default gw 192.168.0.1
Then add your nameserver like this:
echo "nameserver xx.xx.xx.xx" >> /etc/resolv.conf
Next test your network setup by pinging an internet site.
If you made it here you are ready to go!
Next grab the frugal_lite.sh script like this:
wget http://ibiblio.org/pub/Linux/distributions/damnsmall/current/frugal_lite.sh
Now using fdisk create two linux partitions each large enough to
hold DSL. I used 64MB to be safe. Could be smaller.
Format them by using:
mke2fs /dev/hda1
mke2fs /dev/hda2
Next place a GOOD (no bad sectors) floppy into the floppy drive.
Note: The hard drive partitons are NOT mounted. The floppy is NOT
mounted.
Finally run the frugal_lite.sh like this:
./frugal_lite.sh
Follow the prompts.
Upon completion the system will reboot off the DSL boot floppy
and start loading DSL.
Be sure to boot with the following:
boot: dsl vga=normal
Note: After you get your system running from boot floppy (poorman's)
then you can install again into the other partition using the standard
frugal_instal.sh giving you much more control of your system. Use
the (L)ive CD install option as the poorman's is a virtual liveCD.
Or if the other partiton is large enough then do a regular dsl-hdinstall.
If you do this re-install into the other partition either frugal
or full install then you can get rid of the poorman's by using fdisk
to change it to
type 82 (swap) and then format it for swap by using the mkswap /dev/hdaX
Note that TOMSRTBT creates an ext2 partition for linux. After you
get things working, you probably want to turn it into a journalling
system to make it more robust. Use the tune2fs
command to do this.
--------------------------------------
example
[boot tomsrtbt]
#fdisk /dev/hda to 2 partitions:
#hda1=64MB or more (must hold DSL then will become swap)
#hda2=rest of disk (256MB+)
#might have to config tcp/ip
ifconfig eth0 192.168.0.66
route add default gw 192.168.0.1
echo "nameserver [NAMESERVERIP HERE, eg 1.2.3.4]" >>
/etc/resolv.conf
wget http://ibiblio.org/pub/Linux/distributions/damnsmall/current/frugal_lite.sh
chmod a+x frugal_lite.sh
./frugal_lite.sh
#partition to hold ISO=hda2
#target partition=hda1
#be sure floppy has good 1.44MB disk for DSL boot disk
[boot floppy (poor-mans DSL, will run DSL from hda1)]
dsl-hdinstall (into hda2)
cfdisk hda1 type 83->82
mkswap hda1
reboot (DSL should boot from hda2)
[login as root]
tune2fs -j /dev/hda2
[using VI or something else, edit /etc/fstab
and for /dev/hda2, change ext2
to ext3]
reboot
--------------------------------------
How it works:
It grabs the iso from net and temporarily stores it in a partition.
It then moves the KNOPPIX folder to the other partition and creates
the boot floppy, then iso is removed. System then reboots from boot
floppy. Now you are running a poorman's. From there you have the
following choices...
1. You are done! You have a poormans/boot floppy all from the net!
2. You boot up your poorman's DSL and run frugal_instal.sh into
the now other empty partition. Then you don't need the boot floppy
and you have a much more custom system.
3. If the other partition is large enough, then you can: Boot up
from floppy and then do a full dsl-hdinstall into the empty partition.
The choice is your any of the three types. Depending on your hardware
and/or choice.
For older systems it is best to boot using:
boot: dsl vga=normal
and for installing using options 2 or 3 it is best to use:
boot: dsl 2 vag=normal
Also when you have completed options 2 or 3 you can then change
the poorman's partition into a swap partition. From the new DSL
system, run cfdisk and change the proper partition from 83 ot 82.
Then run mkswap on that partition. Reboot and you are all set.
I hope this helps get DSL on many older computers.
This program and page contents are provided without any warranty
at all. Using anything here may make your hair fall out... or worse!
|